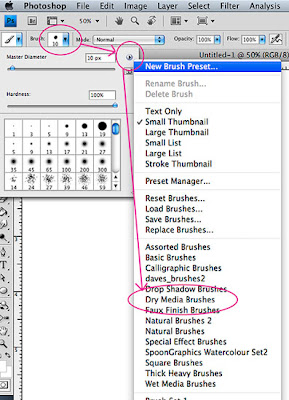
Understanding Brushes is a vital part of using Photoshop for digital illustration. I'm going to cover Brushes in three main parts: the Brush Library, the Brush Panel, and customizing Brushes (creating your own, saving them, organizing them, and setting up your Tool Presets).
The Brush Library is a permanent collection of Brushes. They stay the same between Photoshop sessions. Photoshop CS5 added some great new Brushes to the arsenal, including the Bristle Brushes and the Mixer Brush, which I plan to cover in a subsequent post. CS6 includes those types of Brushes and adds some useful new ones that have a more natural feel.
To get started, choose the Brush (hit the "B" key), then right-click or button-click with the stylus if you're using a pressure-sensitive tablet (which you should). That will bring up the Brush Library. Or you can go all the way up to the Menu and click on the Brush Presets drop-down. Power-Users use the button-click method, by the way.
Here's the Brush Presets Panel:
 |
A: Menu drop-down
B: Brush fly-Out
C: Different views for the Brush Presets
D: Different collections that you can (and should) explore
(Click any of these images to enlarge)
|
The images below show the Default Brushes in List view, and I have made some sample strokes (starting after the utilitarian and boring soft and hard varieties) to give you an example of what they do.
 |
First section of the Brush Presets. The Bristle Brushes,
Charcoal, and Watercolor varieties start to get very interesting! |
 |
| Lots of interesting ones here, too. I like to use the "Airbrush/Grainy" Brushes for texture. You can get a lot of variety with a stylus and these Airbrush variants. |
So get started exploring the default Brush collection. And remember that you can get a wide range of effects by layering, adjusting Opacity and Flow, and using a stylus and tablet with Pen Pressure enabled.
I'll do another post (Part 1A) about the additional libraries, like "Dry Media" and "Natural."
Go to Part 1A


