Monday, August 23, 2021

Reading Event at the Acton Memorial Library

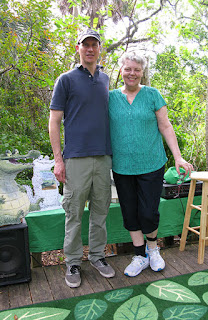
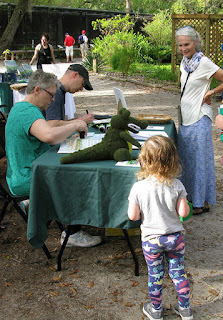
I recently read "All the Birds in the World" to some folks at the Acton Memorial Library. I also talked about my inspiration for writing the book, did a drawing of Kiwi, and raffled off a book and a jigsaw puzzle. Here are a few pictures.


Wednesday, June 30, 2021

Show at the Acton Memorial Library

 I have a show at the Acton Memorial Library (Acton, MA) that will be up in July and August (2021). I'm showing mostly prints from my debut author-illustrator picture book, "All the Birds in the World" (Peter Pauper Press, 2020), as well as some prints from my follow-up, "All the Fish in the World" (Peter Pauper Press, due August 2021). I've included links to buy at the bottom of this post.

Here's the original entrance of the historic
Acton Memorial Library (Massachusetts).


The first video shows the wall that showcases my process. I started off doing tons of designs of the main character, Kiwi. These are mainly ink and watercolor. The second bulletin board shows several ink and watercolor color studies I did. I was originally planning on doing the artwork traditionally--in ink and watercolor--but the art director and editor saw some of my digital work and asked me to do a sample spread in Photoshop. The digital art was more lush, detailed, and colorful, so we went with that. The third bulletin board shows my process from rough sketch to final (digital) art.


The main wall shows illustrations from "All the Birds in the World." The illustrations are pencil drawings that I painted in Photoshop. The last illustration on this wall is art from the book that I adapted into a jigsaw puzzle (sold by Peter Pauper Press).


The last wall displays work from "All the Fish in the World," due out August 2021. These are also pencil with digital color.


This last clip (below) shows a sweep of the full show.


You can buy "All the Birds in the World" (and support independent bookstores in the process) by buying from bookshop.org.

"All the Fish in the World" is not available yet, but I hear you can preorder it from Amazon. Sorry, no link.


"All the Fish" 1,000 piece jigsaw puzzle.

I am also selling framed and unframed prints from the Acton Memorial Library show. If interested, please email me (see my "Contact" page).

Thursday, July 2, 2020

Process for "All the Birds in the World"


Set up: I always start with a pencil sketch on paper. I then add tone in Photoshop. I find it easier to compose a page with a tonal image (Figure 1). Once I feel like the composition is set, I'll do a tight pencil drawing on bristol board, which I shift to a warm brown in Photoshop (Figure 2). 

Then I drop in a background that I created traditionally, so that I have a good base with brushstrokes to build up from (Figure 3). I set the Layer Blending Mode of the drawing Layer to Multiply, so that the white of the paper becomes transparent. Then I change the color of the textured background to a sky blue using Hue/Saturation. The trick at this point is to make sure to check the "Colorize" box (Figure A) before using the Hue slider.

Coloring the foreground: The next step is to block in the shapes in a process called "flatting" (named because I'm just painting in solid "flat" shapes) at 100% opacity, usually in a brown hue (Figure 4).

I create a Layer just above the background texture to paint in more textures and clouds (Figure 5). Putting this on its own Layer allows me to adjust the Layer Transparency to blend in the effects. 

Once I've blocked in all the shapes (the "flatting" I mentioned above) on the Layer below the drawing Layer, I'll check the "Lock Transparent Pixels" box on the Layers Panel (Figure B). That allows me to paint the shapes without making selections. It also gives me crisp edges, which I wanted for this book. I use plenty of photo reference for a book like this as I render the different forms. I usually block in the local color and basic areas with a default Brush, but then switch over to my custom Brushes to get more interesting textures and effects.

The last step is the details: I create a Layer above the drawing and paint in all the final touches with my Custom Brushes (Figure C). I have a library of my Brushes, plus I created a bunch of new ones to get some "feathery" effects just for this book. I'll also soften some of the edges so everything isn't so crisp and "cut-out" looking. By the time I'm finished, there's very little of the initial drawing still visible, but I consider the pencil drawing a vital part of the process.
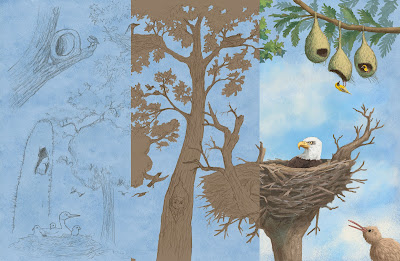
A composite showing different stages of my process.

1. A rough pencil sketch with tone added in Photoshop.

2. Tight pencil sketch. I shift it to brown in Photoshop.

3. I set the Layer Blending Mode of the sketch to Multiply, and then drop
in a textured background that I created with traditional media. I then assign
a color to it using Hue/Saturation, making sure to check "Colorize."
See Figure A below.

4. The "flatting" stage.

5. I start adjusting the background by painting over it. 

6. I lock the transparent pixels (see Figure B below) and paint over the
brown "flatted" areas. The pencil Layer is still the
top Layer.

7. I create a top Layer, above the pencil sketch, and paint in the details.


A. I've circled the Colorize feature on the Hue and Saturation panel.
Make sure to check it and then adjust the Hue slider.

B. Check the circled icon to Lock Transparent Pixels. This will only let you
paint the areas you've blocked in.

C. These are some of the custom Brushes I used.

I animated the Layers (below). I paint over the "flatted" areas, so they don't show up in the video.


Please click here to order the book from bookshop.org and support local and independent bookstores.


Thursday, March 14, 2019

"Gator Day" Photos, Part 2

Here are a few more photos from "Gator Day" at Boyd Hill Nature Preserve (in St. Petersburg, FL)  that B.J. Lee (the author) and I participated in. We had a lot of fun presenting our book, There Was an Old Gator Who Swallowed a Moth. We did a presentation, took questions, signed books, and raffled off prizes.

Here I am, answering questions and bending my arm.

A raffle winner taking home a "Gator" coloring book.

More raffle winners.

Signing books (and drawing a picture inside).

Here's the raffle winner for the large drawing I did.
She was planning to frame the drawing and give it as a
baby shower gift.

Wednesday, March 13, 2019

"Gator Day" Book Event, Part 1

On Sunday, March 10th, the author, B.J. Lee, and I participated in Boyd Hill Nature Preserve's (in St. Petersburg, FL) "Gator Day." B.J. performed a reading (actually, she had memorized the text), I drew a gator, we had a Q&A, there was a crafts table, a gator watch/walk led by a very knowledgeable park ranger, book signing, a raffle...and many other activities. The Boyd Hill Nature Preserve was a wonderful setting for our book event and we're grateful to them for letting us participate.

Here I am with B.J. Lee.

Signing books before the presentation.

The crafts tables were a big hit. 
B.J. captivating the audience with her performance. And, yes,
I showed off my team spirit by donning a "gator" hat during
the presentation.

Here I am drawing the book's main character.

Tuesday, March 5, 2019

Process for "There Was an Old Gator" Illustration


Here's a little peek behind the process I used for the illustrations in the picture book, "There Was an Old Gator Who Swallowed a Moth," written by B.J. Lee and produced by Pelican Publishing. I created the original art with dip pen and watercolors on Arches cold-pressed paper.

The final illustration.


It all starts with a pencil drawing. I add tone in Photoshop to create
a value study.

Here's the ink drawing on Arches cold-press watercolor paper. I use a light
table to trace my drawing. I mostly used a Hunt 101 nib.


Starting to lay in the background.


The background is just about blocked in.


Building up the animals in the foreground.


This is my raw scan before I adjust the colors in Photoshop to better match the
painting and fix things up a little.

Here's my Layers Panel to show how much I adjust the scan. I select most major
colors (using the Magic Wand or Quick Selection Tool), Feather the selection about 5 pixels,
and then open up an Adjustment Layer. In this illustration I also copied and enlarged the
gator's left arm. Click to enlarge.


Wednesday, February 27, 2019

Process for "There Was an Old Gator Who Swallowed a Moth"

I made a short video showing my painting process for an illustration from my recent picture book. The book was written by B.J. Lee and produced by Pelican Publishing.

This is the final illustration done in ink and watercolor.
copyright © 2019 David Opie