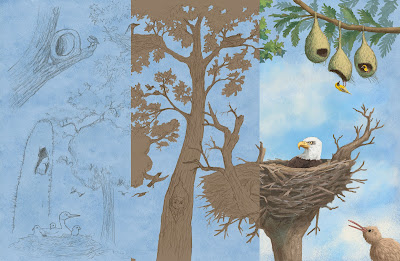
Set up: I always start with a pencil sketch on paper. I then add tone in Photoshop. I find it easier to compose a page with a tonal image (Figure 1). Once I feel like the composition is set, I'll do a tight pencil drawing on bristol board, which I shift to a warm brown in Photoshop (Figure 2).
Then I drop in a background that I created traditionally, so that I have a good base with brushstrokes to build up from (Figure 3). I set the Layer Blending Mode of the drawing Layer to Multiply, so that the white of the paper becomes transparent. Then I change the color of the textured background to a sky blue using Hue/Saturation. The trick at this point is to make sure to check the "Colorize" box (Figure A) before using the Hue slider.
Coloring the foreground: The next step is to block in the shapes in a process called "flatting" (named because I'm just painting in solid "flat" shapes) at 100% opacity, usually in a brown hue (Figure 4).
I create a Layer just above the background texture to paint in more textures and clouds (Figure 5). Putting this on its own Layer allows me to adjust the Layer Transparency to blend in the effects.
Once I've blocked in all the shapes (the "flatting" I mentioned above) on the Layer below the drawing Layer, I'll check the "Lock Transparent Pixels" box on the Layers Panel (Figure B). That allows me to paint the shapes without making selections. It also gives me crisp edges, which I wanted for this book. I use plenty of photo reference for a book like this as I render the different forms. I usually block in the local color and basic areas with a default Brush, but then switch over to my custom Brushes to get more interesting textures and effects.
The last step is the details: I create a Layer above the drawing and paint in all the final touches with my Custom Brushes (Figure C). I have a library of my Brushes, plus I created a bunch of new ones to get some "feathery" effects just for this book. I'll also soften some of the edges so everything isn't so crisp and "cut-out" looking. By the time I'm finished, there's very little of the initial drawing still visible, but I consider the pencil drawing a vital part of the process.
 |
| A composite showing different stages of my process. |
 |
| 1. A rough pencil sketch with tone added in Photoshop. |
 |
| 2. Tight pencil sketch. I shift it to brown in Photoshop. |
 |
| 4. The "flatting" stage. |
 |
| 5. I start adjusting the background by painting over it. |
 |
| 6. I lock the transparent pixels (see Figure B below) and paint over the brown "flatted" areas. The pencil Layer is still the top Layer. |
 |
| 7. I create a top Layer, above the pencil sketch, and paint in the details. |
 |
| A. I've circled the Colorize feature on the Hue and Saturation panel. Make sure to check it and then adjust the Hue slider. |
| B. Check the circled icon to Lock Transparent Pixels. This will only let you paint the areas you've blocked in. |
 |
| C. These are some of the custom Brushes I used. |
I animated the Layers (below). I paint over the "flatted" areas, so they don't show up in the video.
Please click here to order the book from bookshop.org and support local and independent bookstores.
Please click here to order the book from bookshop.org and support local and independent bookstores.

