Wednesday, December 12, 2012

Attaching a Texture to a Brush

Creating Texture to Scan

  • Using a coarse brush, coat illustration board with gesso, modeling paste, or matte medium. Make sure to use a loaded brush so that you get lots of thick brushstrokes. 
  • After the textured board dries, cover it with flat black acrylic paint. Dry brush white paint over the “peaks” to bring out the texture. A 4 by 5 inch area should be enough. 
  • You can create another great texture by rubbing a black colored pencil over cold press watercolor paper. Be careful not to press too hard because you only want to hit the “peaks” of the textured paper. A smaller area will work well for this dry media texture. 

Gel medium (left) and colored pencil on watercolor paper (right)


Optimizing Your Scanned Texture

  • Scan in grayscale at 200 ppi.
  • To increase contrast, open Levels (cmd–L).

Slide the Black Point and White Points toward the histogram curve. 

  • Slide black and white point toward the middle of the tonal curve. 
  • In order to exaggerate the texture, Sharpen using the SmartSharpen Filter (Menu > Filter > Sharpen > SmartSharpen). I usually use the settings 100% at 1 pixel.
  • Optimize for tiling. Filter > Other > Offset (see below), then move the sliders until the seam cuts right through the middle of the image. Use the Clone Stamp to get rid of the seam and to clean up the texture (opt-click to set the point of origin, then paint over the seams. Reset the point-of-origin frequently). 
  • Edit > Define Pattern, give it a descriptive name.
  • You can use these textures as “bump maps” on your illustrations (which I'll describe in a later post to be titled "Mapping Textures") and you can attach them to Brushes (see "Attaching a Texture to a Brush" below).


Move the sliders until the seam cuts through the middle.


Attaching a Texture to a Brush

  • With a Brush as the active tool, go to the Brush Panel. Check Texture, and then click on the Pattern Picker flyout to select the Pattern that you created. Remember, you must save the texture as a Pattern in order for it to show up in the list (step 5 from above).
  • Make sure that “Texture Each Tip” is unchecked, and Mode should be Multiply. 
  • Then adjust Scale, Brightness, and Depth.
  • Transfer should be checked. 
  • You may want to change the “Invert” setting to bring out the texture.

Choose your texture from saved grayscale Patterns.
Check and highlight "Texture" to get these options. "Transfer" will help bring out textures.

Textured Brush strokes. They show up well on a toned base.

Monday, December 3, 2012

Watercolor/Digital Color

With this approach, you start with a tonal painting and add shading, color, and detail in Photoshop. Most of the digital techniques detailed below will preserve the texture of the original scanned artwork.

Start with a tonal watercolor painting—no color necessary—to use for texture and general tones. 

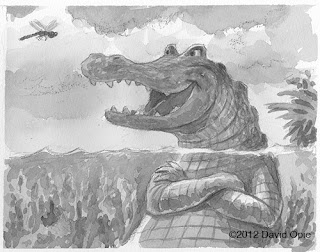
Tonal watercolor painting. Click to enlarge.

Add a Layer and set the Blending Mode to Multiply (see the screen shot at the bottom of the post for the Layer set-up). Paint on the new Layer with a mid-tone gray to build up your shadow areas. Multiply Layers will preserve the texture on the Layer underneath.

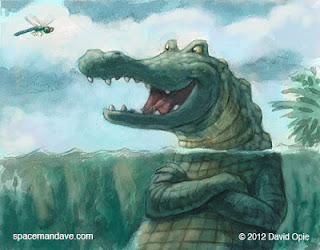
All the color is done in Photoshop. Click to enlarge.

Add a new Layer on top, set Blending Mode to get the effect that you want. I often use either Color or Overlay, although in this example I used Hard Light. On this Layer, create a Gradient or paint large color areas to give the general color structure to your image. Color and Overlay Layers will preserve the texture on the Layer underneath.

You can also add Color or Overlay Layers for more localized color. For detail areas and highlights, add Layers with the blending modes set to Normal. Use a textured Brush (see Attaching a Texture to a Brush) on Normal Layers.

You can lighten areas by creating a new Layer, setting the Layer Blending Mode to Screen, and painting on that Layer. I didn’t do that in this example.

The top Layer in this example is an Adjustment Layer that I used to darken the gator’s body underwater. I made a selection with the Lasso, feathered it, then clicked on the Curves Layer Adjustment (black-and-white circle on the Layer panel). My selection automatically converted to a Layer Mask.

Photoshop CS6 has some great watercolor Brushes, like the “Round Watercolor,” in the default Brush presets. Try painting with them on Multiply Layers to darken parts of your digital watercolor illustration.

Please give me some feedback and let me know if you have any questions about this process.

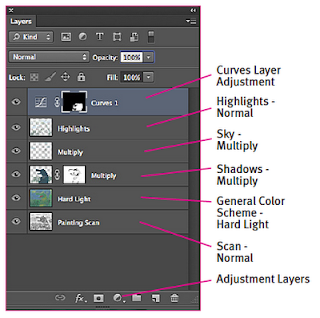
Here's the Layer set-up. Click to enlarge.