With this approach, you start with a tonal painting and add shading, color, and detail in Photoshop. Most of the digital techniques detailed below will preserve the texture of the original scanned artwork.
Start with a tonal watercolor painting—no color necessary—to use for texture and general tones.
 |
| Tonal watercolor painting. Click to enlarge. |
 |
| All the color is done in Photoshop. Click to enlarge. |
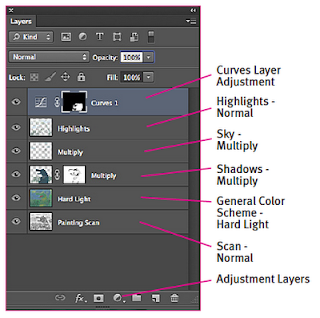
Add a new Layer on top, set Blending Mode to get the effect that you want. I often use either Color or Overlay, although in this example I used Hard Light. On this Layer, create a Gradient or paint large color areas to give the general color structure to your image. Color and Overlay Layers will preserve the texture on the Layer underneath.
You can also add Color or Overlay Layers for more localized color. For detail areas and highlights, add Layers with the blending modes set to Normal. Use a textured Brush (see Attaching a Texture to a Brush) on Normal Layers.
You can lighten areas by creating a new Layer, setting the Layer Blending Mode to Screen, and painting on that Layer. I didn’t do that in this example.
The top Layer in this example is an Adjustment Layer that I used to darken the gator’s body underwater. I made a selection with the Lasso, feathered it, then clicked on the Curves Layer Adjustment (black-and-white circle on the Layer panel). My selection automatically converted to a Layer Mask.
Photoshop CS6 has some great watercolor Brushes, like the “Round Watercolor,” in the default Brush presets. Try painting with them on Multiply Layers to darken parts of your digital watercolor illustration.
Please give me some feedback and let me know if you have any questions about this process.
 |
| Here's the Layer set-up. Click to enlarge. |

4 comments:
How brilliant to have those tips. I'd never have thought a grey underlayer would be useful.
Are you going to link to "Attaching a Texture to a Brush" - is that post you're planning for later?
Ah, yes, I'll post "Attaching a Texture to a Brush" next!
Really good post, I am learning PS finally and find your tutorial really useful.
Thanks
Susan, glad you liked the post. I'll be posting a lot more real soon, so check back!
Post a Comment