I did this illustration for an educational client earlier this year. There were ten illustrations in all.
I started with an ink drawing on paper. I scanned in "Black & White" mode to clean it up. Many of the elements were going to be animated, so I couldn't render the reflections in the water.
 |
| The ink drawing. Click any illustration to embiggen. |
 |
I blocked in the sky on its own Layer. The line work is on a
Layer with the Blending Mode set to Multiply. |
 |
For the water, I painted a big swatch with watercolors, scanned it,
and adjusted it for each of the ten illustrations in this book.
Please see the Layer set-up screen shot at the end of this post. |
 |
I added the clouds on their own Layer. I made a looping selection
with the Lasso for the basic shape. |
 |
I blocked in the cruise ship on its own Layer. I used a Brush with
bristles to accentuate the contour. Please scroll toward the end
of the post to see which custom Brushes I used. |
 |
Here I've painted in the rest of the boats. I block in the shapes at
100% opacity (usually with different browns), then Lock the
Transparent Pixels (see Layer Panel below). After that I render
with custom, textured Brushes. |
 |
| The exhaust on its own Layer. |
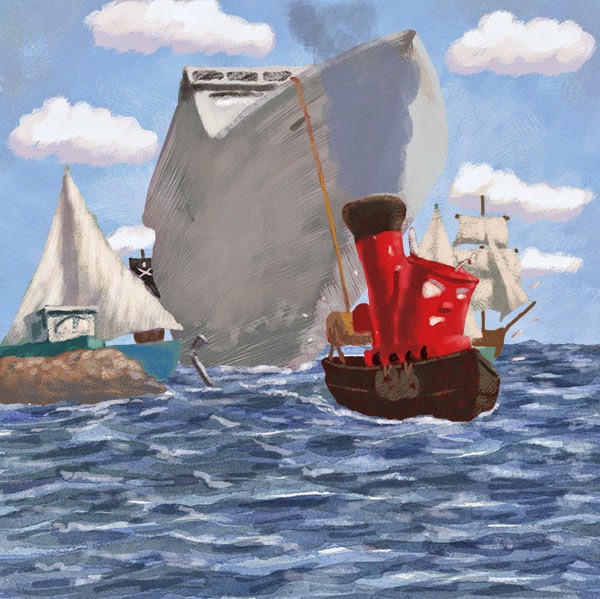 |
| Here's the illustration with no line. |
The client thought that I needed to pump up the colors, so I went through each Layer and made an adjustment: Image > Adjustment > Hue/Saturation; then increased the Saturation. After that I took my Brush, changed the Mode to Color (see screen shot near the bottom of this post), and painted brighter colors over some of the areas. Painting in Color Mode keeps the existing tonal values but just changes the color. You could also create a Layer, set the Blending Mode to Color, and paint on that. Because the client wanted specific elements grouped by Layer, it was easier to make adjustments to individual Layers.
 |
| Here's the final with pumped up color. |
 |
| Detail. Click to enlarge. |
 |
| An animated version. |
 |
| The Layer Panel. Click to enlarge. |
 |
| Here's where you change the Mode for the Brush. |
 |
These are the main custom Brushes that I used. They are included in the
Wet and Dry Media Brush sets. Please see the sidebar for ordering info. |

2 comments:
Nice Dave. Thanks for the scenic route through your creative process.
Stephen, you're welcome! Thanks for dropping by!
Post a Comment